Click Picture to Enlarge (Before install Redline Lighten Crank Pulley)
Dyno test at formula-D Pandan Indah
Modified Parts:
1.Custom Made/Exhuast SYSTEM Setup=Below Rm380
2.REDLINE DROP IN HIGH FLOW PANEL AIR FILTER=RM140
3.Denso Iridium x4=Rm180
4.Custom Grounding Cable=Rm100
Because it is to late,After i finish install the Redline light weight crank pulley Formula-D already close,Unfortunately the light weight crank pulley result will be delay till tomorrow,Please Stay tune Redline light weight crank pulley Dyno result will be update sooner,Thanks you for visit http://www.redlinemax2u.com/
Click Picture to Enlarge (After install redline lighten crank Pulley)
Pulley Gain (2. 55HP)of Power & (0.39kg-m)of Torque
Modified Parts:
1.Custom Made/Exhuast SYSTEM Setup=Below Rm380
2.REDLINE DROP IN HIGH FLOW PANEL AIR FILTER=RM140
3.Denso Iridium x4=Rm180
4.Custom Grounding Cable=Rm100
5.Redline Lighten Crank pulley
After installed & Dyno Tuning Apexi AFC-NEO Compare with my Stock Altis1.8G
Total Gain(16.27HP)of Max Power & (1.58Kg-m) of Torque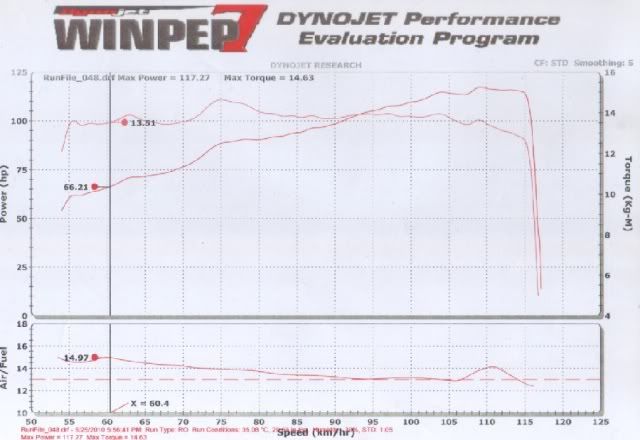
Automatic Transmision Dyno until second gear only
Current Result:
Hp RPM
Max Power :117.27/6,250
Max Torque:14.63/4,500
Stock
Max Power :101/6,150
Max Torque:13.05/4,500
Modified Part
Redline lighten Crank Pulley RM380
Redline High flow drop in panel filter Rm140
Custome exhaust setup Estimate Rm380
Denso Iridium Plug RM180
Custome made Grounding Rm100
Apexi AFC NEO RM1500+(with installation)
Total spend:Rm2680 for (16.27hp) & (1.58Kg-m)


